Wednesday, November 30, 2011

Merry Giftmas!

I'm sorry to report that there was trouble in blog land last night, and due to circumstances beyond my control I was unable to get this project posted. Thankfully all is well tonight, so here we go!
 
This is another project that my stamp club made last week. I don't really know how to classify this one: it's a card with unique folds that holds a gift card, so I guess I'll call it a Giftmas card!

Recipe
Stamps: Four the Holidays, Many Merry Messages
Paper: Old Olive, Early Espresso, Marina Mist & Whisper White CS; Letters to Santa DS paper
Ink: Riding Hood Red
Accessories: Northern Frost decorative strip die & Big Shot; 5/16" Jumbo Brads Neutrals; 3/4" circle punch; paper piercing tool

You will need:
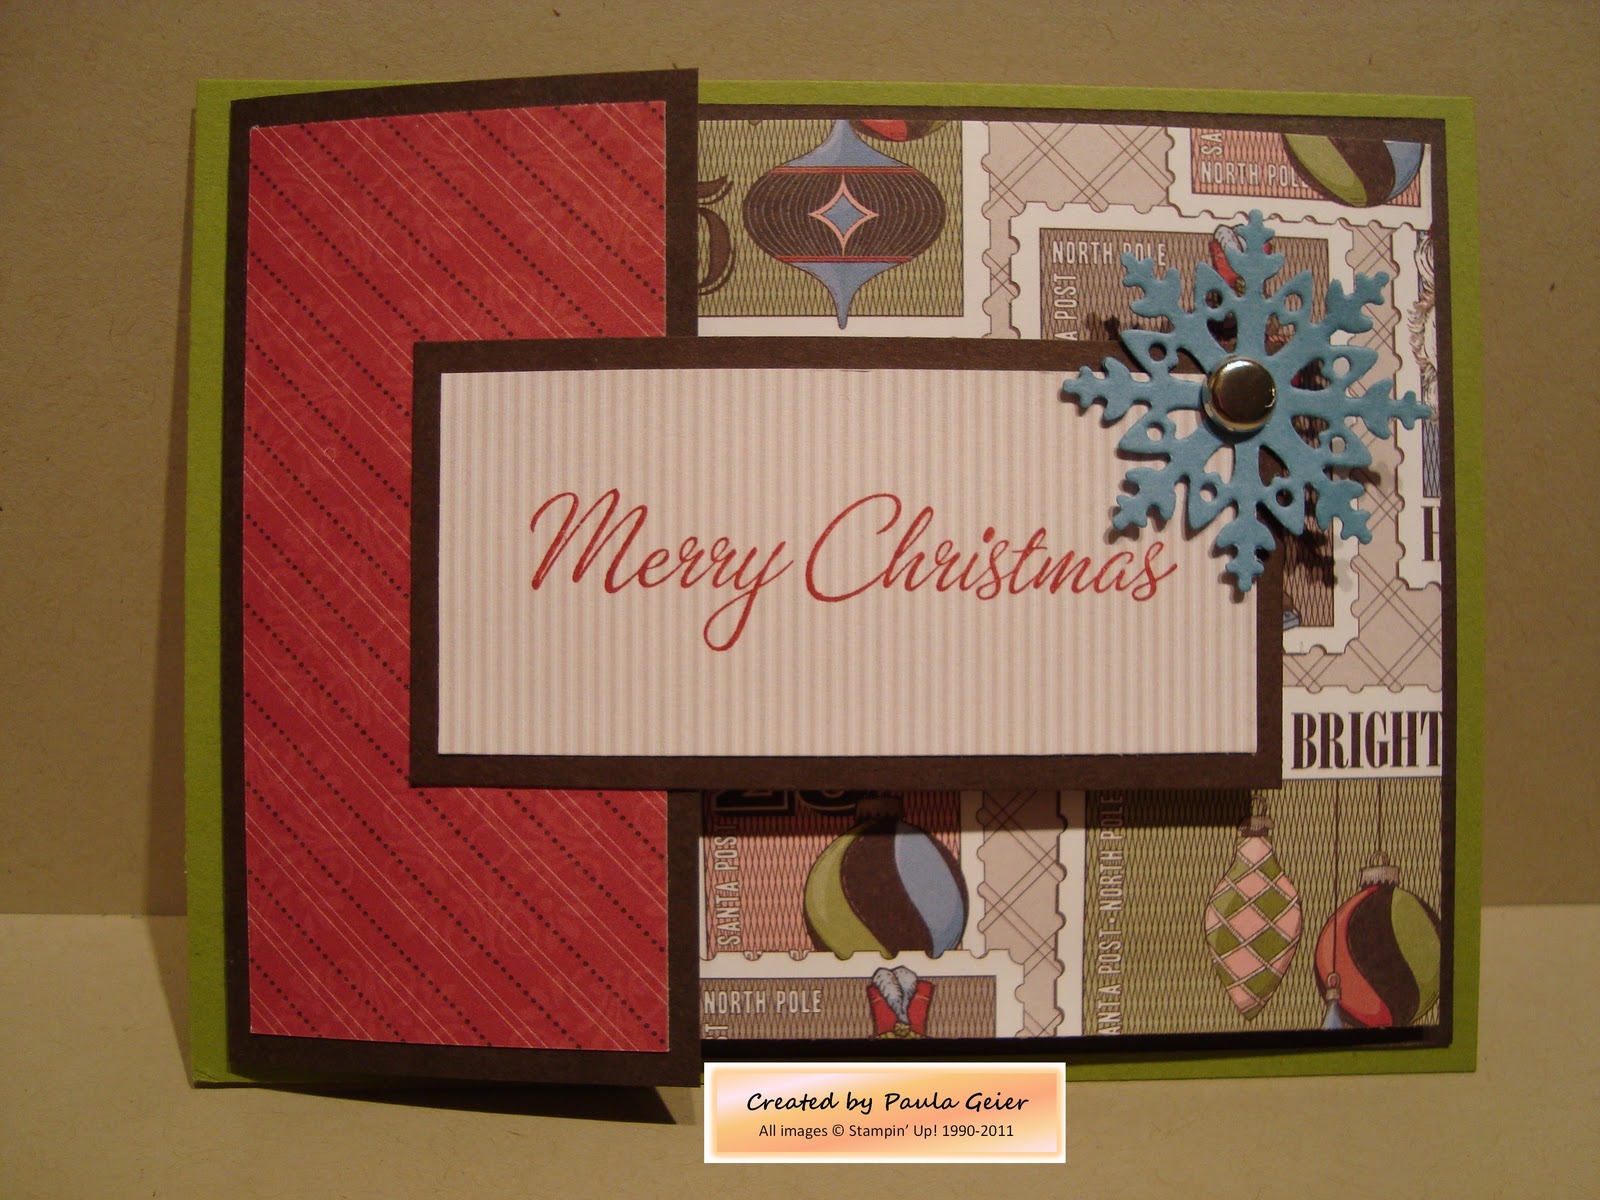
  1. Old Olive CS cut to 5-1/2" x 4-1/4"
  2. Early Espresso CS cut to 7-1/4" x 4", score at 2"
  3. Whisper White CS cut to 8-1/2" x 3-3/4", score at 3-1/2"
  4. Designer Series paper (RHR diagonal stripes) cut to 3-3/4" x 1-3/4" for left front
  5. Designer Series paper (postage stamp images) cut to 3-3/4" x 3-1/2" for right front
  6. Early Espresso strip cut to 3-1/2" x 1-3/4" for front greeting layer
  7. Designer Series strip (Crumb Cake stripes) cut to 3-1/4" x 1-1/2" for front greeting
  8. Designer Series paper (Old Olive diagonal stripes) cut to 3-3/8" x 2-1/2" to hold gift card
To assemble:
  • Adhere Early Espresso piece to Old Olive base with fold at left.
  • Adhere Whisper White piece to Early Espresso piece with fold at right.
  • Adhere RHR rectangle to left front Early Espresso piece.
  • Adhere postage stamp images piece to front fold of Whisper White piece.
  • Punch a half circle out of the top of the Old Olive diagonal stripes piece and adhere to inside right of the Whisper White CS.
  • Stamp greeting on Crumb Cake stripes DS paper with Riding Hood Red.
  • Adhere greeting to strip of Early Espresso and adhere EE strip to left fold of card front.
  • Use the Northern Frost die with Marina Mist CS in the Big Shot to cut a variety of snowflakes.
  • Punch a hole in the upper right corner of the greeting strip and add your choice of snowflake to front using a brad.
  • Stamp a greeting inside your card, and you have a unique way to give a gift card! I did use Velcro dots on the back side of the greeting strip to hold the card closed.
These make great little gifts for teachers and other special people, and you can vary the Designer Series paper you use to make them appropriate for any occasion. Now go and create your own Giftmas card - well, not right this minute...unless you're an insomniac!


Friday, November 25, 2011

Telescoping Christmas

No, my computer didn't crash, and I didn't forget my blog password. Between work and taking advantage of the beautiful November weather to finish up a lot of painting both outside and inside the house, I've been very busy! To make up for those lost three weeks in blog land, I'll be posting lots of Christmas cards in the next few weeks.

The first is one that my stamp club really enjoyed making last week. It's called a telescoping card, and it's actually very easy to put together. I received some Marina Mist Scallop Dots Ribbon from my upline (along with some other goodies) as a reward for meeting a selling goal, and when I opened up the ribbon it immediately sparked the idea for this card. Using my trusty Color Coach as a guide, I paired it with Real Red and Old Olive for a unique and interactive Christmas Card!

Recipe
Stamps: Bright Hopes (Holiday Mini)
Paper: Marina Mist & Whisper White CS
Ink: Marina Mist & Real Red classic ink pads, Old Olive craft pad
Accessories: Big Shot & Scallop Circle, 3-1/2" Circle & 3" Circle dies; 2-1/2" Circle punch; Word Window punch; Iridescent Ice embossing powder; heat tool; paper piercing tool; Circle Fire rhinestone brads; Basic Rhinestones; Silver brads

You need one Marina Mist scallop circle, two 3-1/2" Whisper White circles, one Marina Mist 3" circle, and one 2-1/2" Whisper White circle. Using the Old Olive craft pad, stamp the wreath image on the smallest circle and the Christmas tree on one of the 3-1/2" circles, sprinkle Iridescent Ice embossing powder on both and then heat emboss. On the remaining 3-1/2" circle stamp the "Wishing you a season..." greeting in Real Red and the snowflakes around the outside in Marina Mist. Adhere the Christmas Tree image to the Marina Mist scallop circle and the wreath image to the small Marina Mist circle.

To assemble the card, take the 'greeting' circle, lay it upside down (so you can see the words but they are upside down) over the Christmas Tree image, pierce a hole in the 'top' center of the white circle (actually the bottom of the circle but it's upside down!) and insert a silver brad. Now you can swing the 'greeting' circle up so you can read the words. Then take the wreath circle and center it over the 'greeting' circle, punch a hole in the Marina Mist margin at the top center and insert another brad. Swing the wreath image up to add the ribbon. Fold a 4" piece of ribbon in half and punch a hole in the bottom center with the 1/16" circle punch. Using the piercing tool, punch a hole in the top center of the wreath and insert the Circle Fire brad, then push the brad through the hole in your ribbon. To 'close' the card, hold near the ribbon and swing to the right and down until the circles line up neatly inside each other. You have just made a telescoping card!

To finish off the wreath image, stamp "Merry Christmas" in Real Red on a scrap of 5/16" wide Whisper White paper. Hold your Word Window punch so you are looking at the back, insert one end of the scrap into the right side of the punch opening, and punch off the square end. Turn the scrap and finish off the other end the same way, and adhere over the center of the wreath using Stampin' Dimensionals. To add a bit more color to the wreath, I colored our basic Rhinestones using a red Sharpie marker and then adhered them in a random pattern.

Isn't this a neat idea? You could also change things up a bit and add a family photo in the bottom circle instead of the tree. I'm afraid my photos don't capture the real sparkle of the Iridescent Ice; it looks much better in real life!

Well, that's it for this week - I'll see you next Tuesday with another sweet Christmas idea!