Saturday, February 4, 2012

Be My Origami Valentine

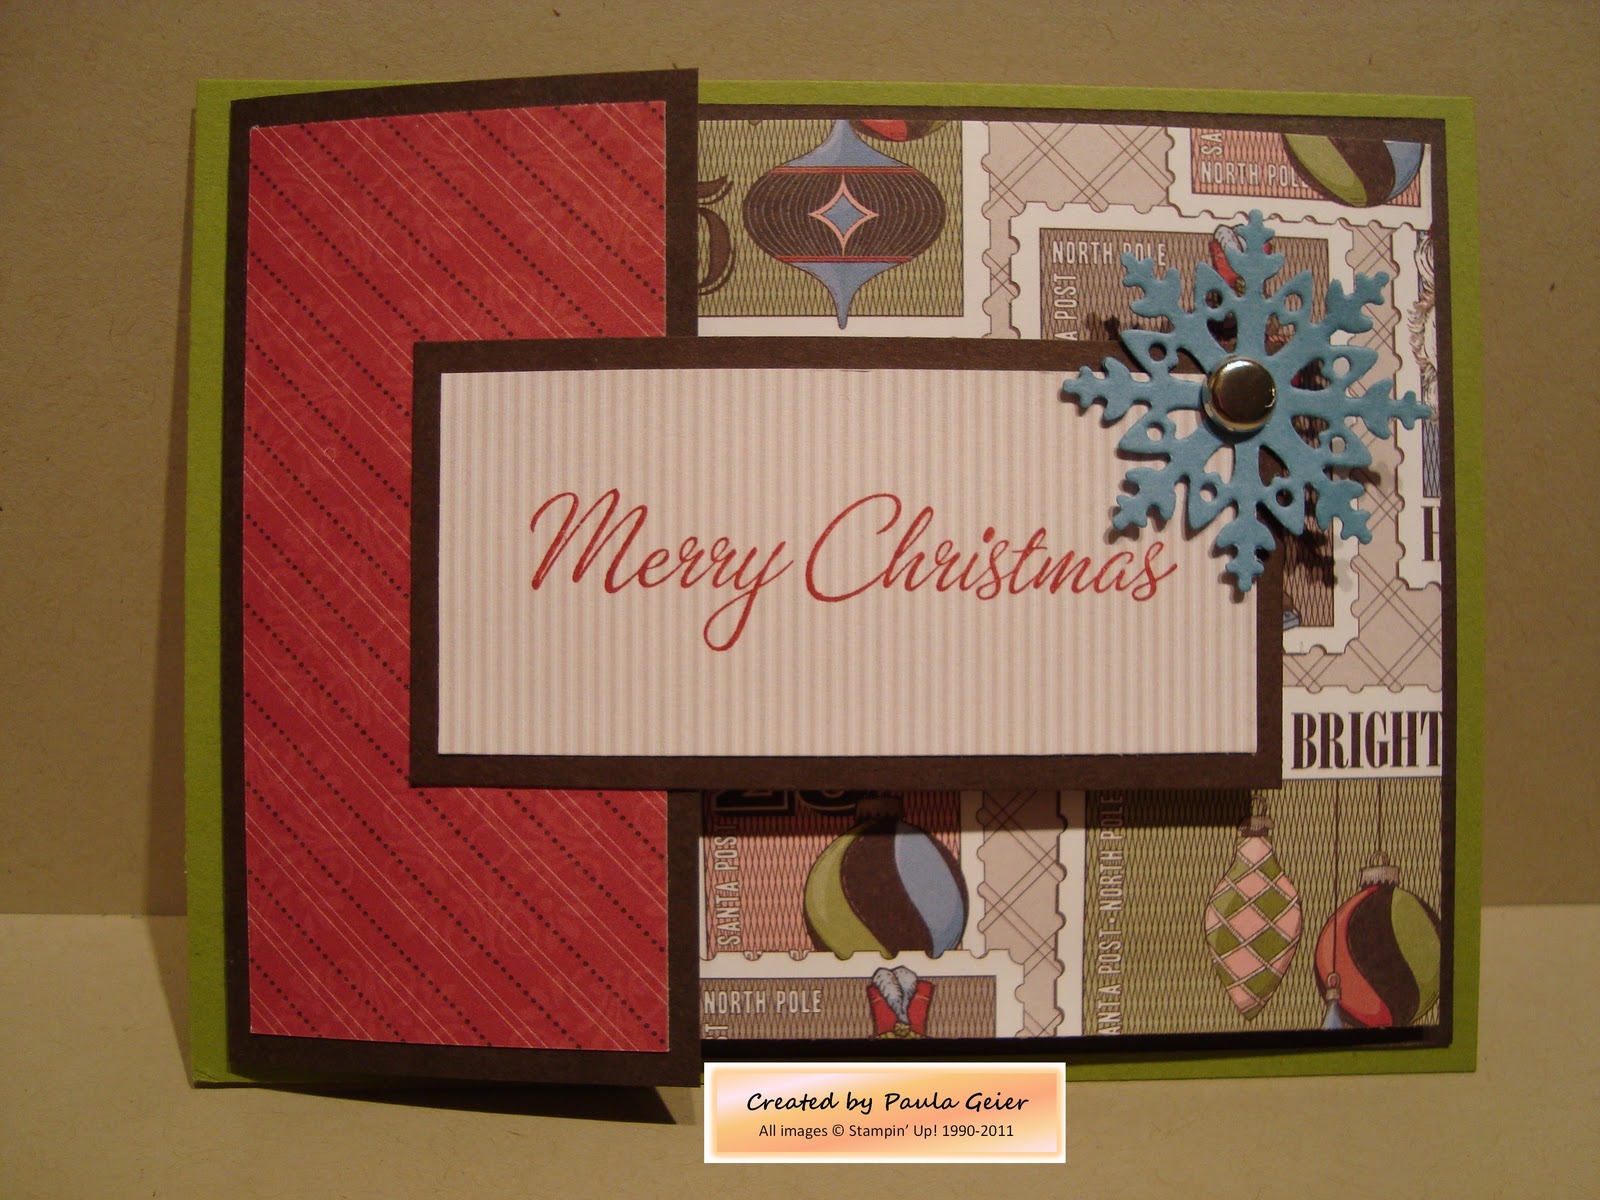
I honestly don't know where the time goes sometimes; Valentine's Day will be here before I know it! Here's another project that my stamp club did last month. It's a funky fold project, meaning that it's a project that uses unique folds instead of the standard side-fold or tent-fold. This Origami Diamond Fold was actually a very easy project to complete using the new Simply Scored Scoring Tool, available in the mini catalog.

Recipe
Stamps: Delightful Dozen, Sprinkled Expressions (sale-a-bration)
Paper: Twitterpated Designer Series Paper (mini catalog); Basic Gray, Real Red & Whisper White CS; Red Glimmer Paper
Ink: Real Red, Basic Gray
Accessories: Simply Scored Scoring Tool; Big Shot & Perfect Pennants die; Decorative Label, 1-3/4 Circle, Full Heart & Small Heart punches; Whisper White 3/8" taffeta ribbon; Stampin' Dimensionals

There is a wonderful tutorial of this funky fold project here. However, I did make some changes to the scoring lines so that the origami pocket would be centered on the project, and scored at 3-1/4", 5-1/2", 10" and 12-1/4".

Hope you enjoyed this funky project! I'll be sharing some treats next week, so hope to see you then. Sweet dreams!

Saturday, January 21, 2012

Twitterpated!

Well, I survived birthday week, but just barely! My youngest son turned 18 recently, and it was very hard for me...the realization that he is now an adult somehow made me feel SO much older. Probably because now that he IS considered an adult, we have to take special steps to protect him, as he could be considered a vulnerable adult due to his autism spectrum disorder. Needless to say there is lots of paperwork involved in that protection, which is why I've been absent from blog land for a while.

But now that I'm back, I'm going to share one of the projects my stamp club did this week. Our theme was "It's All About Hearts!" in preparation for Valentine's Day. This card, however, was not the one I had originally planned for the club. My mom, who is a club member, came over to celebrate birthdays (my oldest son also turned 29) two days before the club was to meet, so she made her projects then. Unfortunately the original Smooch Spritz project I had planned turned out to be not very club-friendly, so I had to make a last-minute change. Thankfully I had this wonderful layout in my head, as I had just seen it on the talented Chris Smith's blog. Thanks for the inspiration, Chris!

Recipe
Stamps: Word Play
Paper: Whisper White & Riding Hood Red CS, Twitterpated Designer Series Paper (mini catalog)
Ink: Basic Gray & Riding Hood Red markers
Accessories: Square Lattice & Petals-a-Plenty embossing folders & Big Shot; Baja Breeze Seam Binding Ribbon; Framelits Dies Labels Collection; Heart to Heart punch; Vanilla Shimmer Smooch Spritz; Illuminate Top Coat Smooch Pearlized Accent Ink; Basic Pearls; Stampin' Dimensionals

I just LOVE the new Framelits Dies in the Occasions Mini catalog! They are so easy to use, and with six different sizes to choose from there are endless layout possibilities. The colors in the beautiful Twitterpated Designer Series paper are some of my favorites, and of course they coordinate so well that this card practically made itself! The embossing folders add interesting texture, and the Smooch products add just the right amount of glimmer. I hope you can see in the close-up how I "painted" with the Illuminate accent ink along the top right edges of the greeting layer. You may also be able to see how the flowered paper is embossed with the Petals-a-Plenty folder. This card is very versatile, and could be used for many occasions such as an anniversary, "thinking of you" or even a birthday or sympathy card. 

The cold wind is really blowing the snow around outside my dark window, so I'm looking forward to climbing into bed under some warm blankets. Sweet dreams!

Saturday, January 7, 2012

Jolly Bingo Birthday!

It's time to get back to work now that the holidays have come and gone. I hope everyone had a memorable Christmas and is enjoying the new year! During the next six weeks my family will be celebrating over 10 birthdays, so I really have to buckle down and get some serious stamping done.

Tonight I'm giving you a sneak peak of some of the new products available for FREE during the upcoming Sale-A-Bration, which starts January 24. It's a birthday card, of course! I've been wanting to use this neat layout ever since I saw it; it's borrowed from the very talented Mary Brown (aka stampercamper). The stamp set I'm using is actually a Christmas set called Jolly Bingo Bits, but it is so versatile that it can be used all year long.

Recipe
Stamps: Jolly Bingo Bits, Fabulous Phrases
Paper: Pool Party, Calypso Coral & Whisper White CS; Everyday Enchantment DS paper (SAB)
Ink: Pool Party, Calypso Coral, Lucky Limeade & Basic Gray
Accessories: Tasteful Trim die & Big Shot; Everyday Enchantment Ribbon & Brad Pack (SAB); Basic Rhinestones; 1/16" circle punch; Paper Snips; Stampin' Dimensionals

Isn't this a fun layout? The Pool Party card base is cut 3-1/4" x 11" and folded in half, allowing the greeting layer to hang over the edge for just an extra pop of interest. The ribbon bow is also done using Mary Brown's technique, but since the organdy ribbon is thin I wrapped it three times around a cardstock scrap, then carefully slid it off and inserted it in the opened brad, then closed the brad and popped it through the greeting layer. The greeting layer is popped off the base using Dimensionals.

I just love the Everyday Enchantment DS paper and matching accessories; the color combinations are really fresh and I know you'll love the patterns as much as I do! As much I'm looking forward to Sale-A-Bration, though, I'm even more excited about the Occasions Mini Catalog, which went live on January 4th. It is chock full of exciting new products and stamp sets - so many wonderful things that I'm having a hard time trying to talk myself out of just ordering everything in the catalog!! You'll be seeing me use some of those new products here in the coming weeks, so check back once in a while.

Time now for me to head off to bed, where I hope I can dream up some more sweet birthday layouts. G'night!

Monday, December 19, 2011

Let it snow, let it snow...

Only six days until Christmas, and we have no snow here in west central Minnesota. I don't like it. I don't mind the mild temperatures, but it sure would be a lot prettier with all the brown covered up by an inch or two of that sparkling white stuff! In my humble opinion, it's just not Christmas in Minnesota without snow. So, tonight I'm posting this card to help remind me of what snowflakes look like.

Recipe
Stamps: Teeny Tiny Wishes
Paper: Whisper White & Bashful Blue
Ink: Bashful Blue
Accessories: Northern Flurry embossing folder & Big Shot; Modern Label & Large Oval punches; Basic Rhinestones; sponge wedge, Stampin' Dimensionals

This is a super easy card to put together! Using the sponging technique, I lightly brushed an inked-up sponge wedge over the raised portions of the design to bring out the snowflake images. Then I lightly sponged around the snowflakes to give the background some depth.  I finished it off by popping the greeting up on Dimensionals and adding a couple of sparkly rhinestones.

Friday, December 9, 2011

Bright Hopes for Christmas

Only 16 days until Christmas! Time is flying by way too fast. Are you ready? If you don't have your Christmas cards started yet, here's another idea for you. This is another one of the sets that caught my eye immediately when I first saw the Holiday Mini Catalog. I just love the elegant look of the scrollwork images, and the style is similar to that of Norwegian rosemaling - another art form I really love!

Recipe
Stamps: Bright Hopes
Paper: Crumb Cake, Always Artichoke, Cherry Cobbler
Ink: Always Artichoke craft Stampin' Spot
Accessories: Iridescent Ice embossing powder & heat tool, Snow Burst embossing folder (Mini catalog) & Big Shot, piercing tool, Clear Rhinestone brad, Cherry Cobbler Seam Binding Ribbon, Stampin' Dimensionals

This card is simple enough that you could easily mass-produce quite a few at one time. The Snow Burst embossing folder adds just the right background texture, and I purposely separated the wreath and greeting images, as well as adding the contrasting color layers, to give the impression of a wreath hanging on the outside of a door. The Iridescent Ice gives the wreath an icy sparkle, and of course the bow (done the easy stampercamper way) is the perfect finishing touch.

It's been a long and busy week, and I'm ready for some serious relaxation this weekend - in between finishing my Christmas shopping online and doing some more holiday decorating! Hope your weekend is just as sweet!


Tuesday, December 6, 2011

The Sounding Joy

This is the third project that my stamp club made at our last get-together. This was one of the first sets to go on my wish list when the Holiday Mini catalog came out. As an organist, Christmas is my very favorite season of the year...all those beautiful hymns sung from the heart by a congregation while the candlelight flickers throughout the church. "Joy to the World" is one of my favorite hymns, and I just love to pull out all the stops and just let the music soar! I was inspired by a lovely card made by Jen Sannes, and changed up the colors and layout to better suit my taste.

Recipe
Stamps: The Sounding Joy (Holiday Mini)
Paper:  Cherry Cobbler & Very Vanilla CS (stamp club used Shimmery White and it was beautiful!), Early Espresso textured & smooth CS; Silver Glimmer paper
Ink: Crumb Cake, Cherry Cobbler
Accessories: Big Shot, Petals-a-Plenty embossing folder, Tasteful Trim die, 3-1/2" circle die, Cherry Cobbler Quilted Satin Ribbon (mini catalog), piercing tool, Clear Rhinestone brad, Basic Rhinestones, Sticky Strip, Stampin' Dimensionals

The assembly of this card is pretty self-explanatory. The only tip I have is to use Sticky Strip to adhere the Cherry Cobbler to the Silver Glimmer paper, as regular adhesive just isn't sticky enough. I also used a dull scissor to clip off the tip of the brad that was showing on the top outside of the circle. The bow is, of course, made the stampercamper way...refer to previous posts for instructions.

That's all for tonight, as it's past my bedtime and I have a busy week ahead of me. Hope to see you again in a few days, and until then, keep it sweet!

Wednesday, November 30, 2011

Merry Giftmas!

I'm sorry to report that there was trouble in blog land last night, and due to circumstances beyond my control I was unable to get this project posted. Thankfully all is well tonight, so here we go!
 
This is another project that my stamp club made last week. I don't really know how to classify this one: it's a card with unique folds that holds a gift card, so I guess I'll call it a Giftmas card!

Recipe
Stamps: Four the Holidays, Many Merry Messages
Paper: Old Olive, Early Espresso, Marina Mist & Whisper White CS; Letters to Santa DS paper
Ink: Riding Hood Red
Accessories: Northern Frost decorative strip die & Big Shot; 5/16" Jumbo Brads Neutrals; 3/4" circle punch; paper piercing tool

You will need:
  1. Old Olive CS cut to 5-1/2" x 4-1/4"
  2. Early Espresso CS cut to 7-1/4" x 4", score at 2"
  3. Whisper White CS cut to 8-1/2" x 3-3/4", score at 3-1/2"
  4. Designer Series paper (RHR diagonal stripes) cut to 3-3/4" x 1-3/4" for left front
  5. Designer Series paper (postage stamp images) cut to 3-3/4" x 3-1/2" for right front
  6. Early Espresso strip cut to 3-1/2" x 1-3/4" for front greeting layer
  7. Designer Series strip (Crumb Cake stripes) cut to 3-1/4" x 1-1/2" for front greeting
  8. Designer Series paper (Old Olive diagonal stripes) cut to 3-3/8" x 2-1/2" to hold gift card
To assemble:
  • Adhere Early Espresso piece to Old Olive base with fold at left.
  • Adhere Whisper White piece to Early Espresso piece with fold at right.
  • Adhere RHR rectangle to left front Early Espresso piece.
  • Adhere postage stamp images piece to front fold of Whisper White piece.
  • Punch a half circle out of the top of the Old Olive diagonal stripes piece and adhere to inside right of the Whisper White CS.
  • Stamp greeting on Crumb Cake stripes DS paper with Riding Hood Red.
  • Adhere greeting to strip of Early Espresso and adhere EE strip to left fold of card front.
  • Use the Northern Frost die with Marina Mist CS in the Big Shot to cut a variety of snowflakes.
  • Punch a hole in the upper right corner of the greeting strip and add your choice of snowflake to front using a brad.
  • Stamp a greeting inside your card, and you have a unique way to give a gift card! I did use Velcro dots on the back side of the greeting strip to hold the card closed.
These make great little gifts for teachers and other special people, and you can vary the Designer Series paper you use to make them appropriate for any occasion. Now go and create your own Giftmas card - well, not right this minute...unless you're an insomniac!